

Support -> How To Book an Appointment (Click'n Drag Method)
How To Book an Appointment (Click'n Drag Method)
This guide will show you how to create an appointment using a booking calendar by simply clicking and dragging the mouse directly on the staff and/or room column.
Step 1. Access the "Staff Day Planner" Section
After selecting the "Planners" tab in the online booking calendar software, select the "Staff Day Planner" tab.

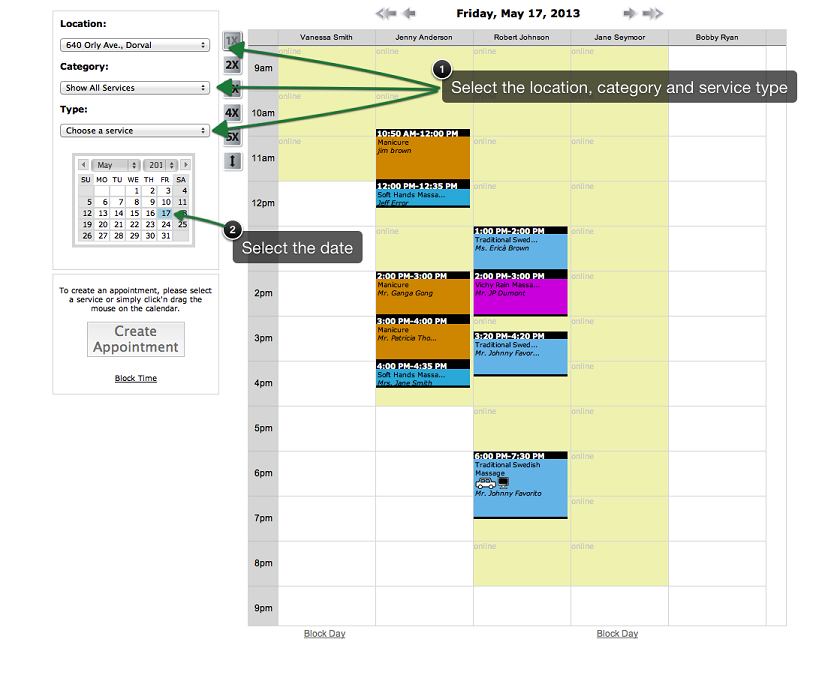
Step 2. Filter the Booking Calendar Options and Select the Appointment Date
Filtering is not mandatory. However, when you have many staff members or
when you are unsure of which staff members offer specific services, the filters will make booking an appointment quicker. Only
staff members that fit the selected booking criteria are display in the calendar.
To filter the calendar results, simply select a category and type of service using the drop down menus to the left of the planners.
To select the appropriate date, the mini monthly calendar on the left. The selected date will become blue and schedules for that day will appear on the planners. You may also scroll through the dates using the arrows located above the daily schedule.
To select the appropriate date, the mini monthly calendar on the left. The selected date will become blue and schedules for that day will appear on the planners. You may also scroll through the dates using the arrows located above the daily schedule.
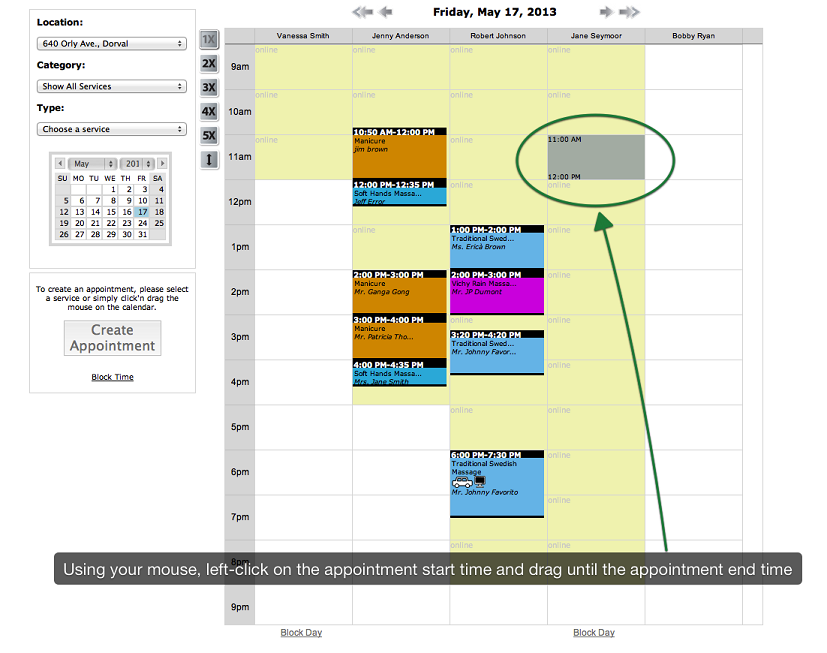
Step 3. Highlight the Appointment Start Time and End Time on the Booking Calendar
In the column corresponding to the staff member with whom you would like to book a service, left-click
on the time you want the appointment to begin. Without releasing the button, drag the cursor to the
end time of the appointment and release the button.
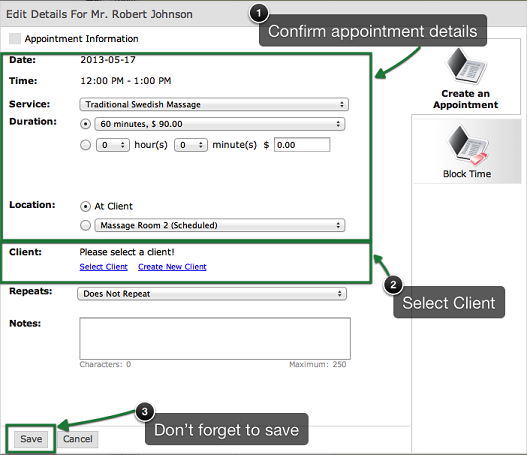
Step 4. Confirm the Appointment Details
In the appointment details window that appears:
- Confirm the type of service using the drop down menus;
- Confirm the duration and cost using the preset parameters or by setting a custom duration and cost;
- Select the room where your service will take place;
- Select the client you want to book the appointment for by clicking on the links to open the customer database. You may select the client by entering his or her name, e-mail, phone number, or group in the search box; you may also find your client by simply searching the paginated results. If the client does not yet exist in the database, you may add him or her by clicking on the "Create New Client" link in the top right corner of the window, or by clicking on the "Create New Client" in the appointment details window. You can also add the new client profile prior to creating the appointment as well by accesing the complete client profile form within the "Clients" module. Also note, you can select a client that from your waiting list by clicking the "Waiting List" link.
IMPORTANT
a) Once a time slot is booked, it no longer appears as available in the customer portal: customers will not be
able to book another appointment during that time slot.
b) Appointments may be internally booked outside the available times displayed in the schedule (shown in beige).
c) A grey time slot in the schedule indicates that the time slot is only available for booking through the online
portal. This occurs when you have set a different schedule for your online portal.
d) All appoinments with an "Attended" status are archived in the system for future reference. The status may be
changed manually in the appointment details window, or may be set to "Attended" automatically by selecting this
option under "Advanced Settings". Appointments are set to "Attended" in the middle of the night.
© 2009 - 2019 datedechoix.com